
Order blocks have become one of the most talked-about concepts in retail trading over the past few years. The term comes from institutional trading — an order block is the candle (or cluster of candles) where a large institution placed a significant buy or sell order before a strong move. When price returns to that level, the institution may defend it, creating a high-probability reaction zone.
The problem? Most explanations online are either too theoretical (drawn on blank charts with arrows) or too guru-ish ("just feel where the smart money is"). This guide is practical. I'll explain every concept with how I actually identify and trade order blocks in MetaTrader 5, and how I automated the detection so I don't have to manually search for them.
What Is an Order Block, Really?
Strip away the jargon and an order block is this: the last opposing candle before a strong impulse move.
- Bullish order block: The last bearish candle before a strong upward move that breaks structure. An institution was buying at that level — the bearish candle represents the accumulation before the markup.
- Bearish order block: The last bullish candle before a strong downward move that breaks structure. An institution was selling — the bullish candle represents distribution before the markdown.
Why does this matter? When price returns to an order block, the institution that placed the original order may have unfilled orders at that level. They'll add to their position, causing price to react — a bounce at a bullish OB, a rejection at a bearish OB.
Not every order block works. The key is context — where the OB sits relative to market structure, how strong the impulse move was, and whether the OB has already been tested.
Break of Structure (BOS) and Change of Character (CHoCH)
To identify valid order blocks, you first need to understand market structure:
- Break of Structure (BOS): When price breaks the most recent swing high in an uptrend (or swing low in a downtrend), confirming that the current trend continues. A BOS is a continuation signal.
- Change of Character (CHoCH): When price breaks in the opposite direction — breaking a swing low in an uptrend, or a swing high in a downtrend. A CHoCH signals a potential trend reversal.
Why this matters for order blocks: an order block is only valid if it precedes a move that creates a BOS or CHoCH. If the impulse after the OB candle doesn't break any structural level, it's not a real institutional move — it's just a regular candle.
In Order Block Sniper Pro, I automated this detection. The indicator identifies swing highs and lows, tracks when price breaks them (BOS or CHoCH), and then marks the order block that preceded the break. Manual traders spend 15 minutes per chart finding these; the indicator does it in milliseconds.
Fair Value Gaps (FVG): The Imbalance Zones

A Fair Value Gap (also called an imbalance or FVG) is a three-candle pattern where the middle candle's range is so strong that it leaves a gap between the first candle's high and the third candle's low (for bullish FVGs) or between the first candle's low and the third candle's high (for bearish FVGs).
In simpler terms: price moved so fast that it didn't fully trade through the range, leaving an "unfair" gap. Markets tend to fill these gaps — price will often return to the FVG level before continuing in the original direction.
How I use FVGs with order blocks:
- When an order block and an FVG overlap, the zone is extremely strong. The institution's entry level coincides with an imbalance that the market wants to fill.
- I track whether FVGs get filled (50% or more of the gap retraced) or remain open. Unfilled FVGs are pending magnets — price will likely visit them eventually.
- On gold, FVGs during the London-New York overlap tend to fill within the same session. Asian session FVGs may take 1-2 days to fill.
Liquidity Sweeps: How Institutions Hunt Stops
This is the concept that connects smart money theory to practical trading. Institutions need liquidity to fill large orders. Where is liquidity? At obvious levels where retail traders place stop losses.
- Above swing highs — buy stops from short sellers protecting their positions
- Below swing lows — sell stops from long traders protecting their positions
- At round numbers — psychological levels where orders cluster
A liquidity sweep happens when price briefly penetrates these levels, triggering the stops, then reverses. The institution grabbed the liquidity it needed and now pushes price in its intended direction.
My order block setup detects liquidity pools at known swing points and alerts when a sweep occurs. The ideal OB trade includes: liquidity sweep → return to order block → entry on confirmation → ride the move.
Premium and Discount Zones
Here's a framework that simplifies order block trading: divide the current trading range into premium and discount zones.
- Premium zone: Above the 50% level (equilibrium) of the current range — price is "expensive." Look for bearish order blocks to sell.
- Discount zone: Below the 50% level — price is "cheap." Look for bullish order blocks to buy.
This prevents a common beginner mistake: buying a bullish order block in a premium zone. Even though the OB is valid (the impulse was real), you're buying at a high price within the range. The highest-probability trades happen when you buy OBs in discount and sell OBs in premium.
My indicator colors candles based on which zone they're in — premium candles get a warm tint, discount candles get a cool tint. This visual overlay makes it impossible to accidentally take a trade in the wrong zone.
Order Block Strength Scoring
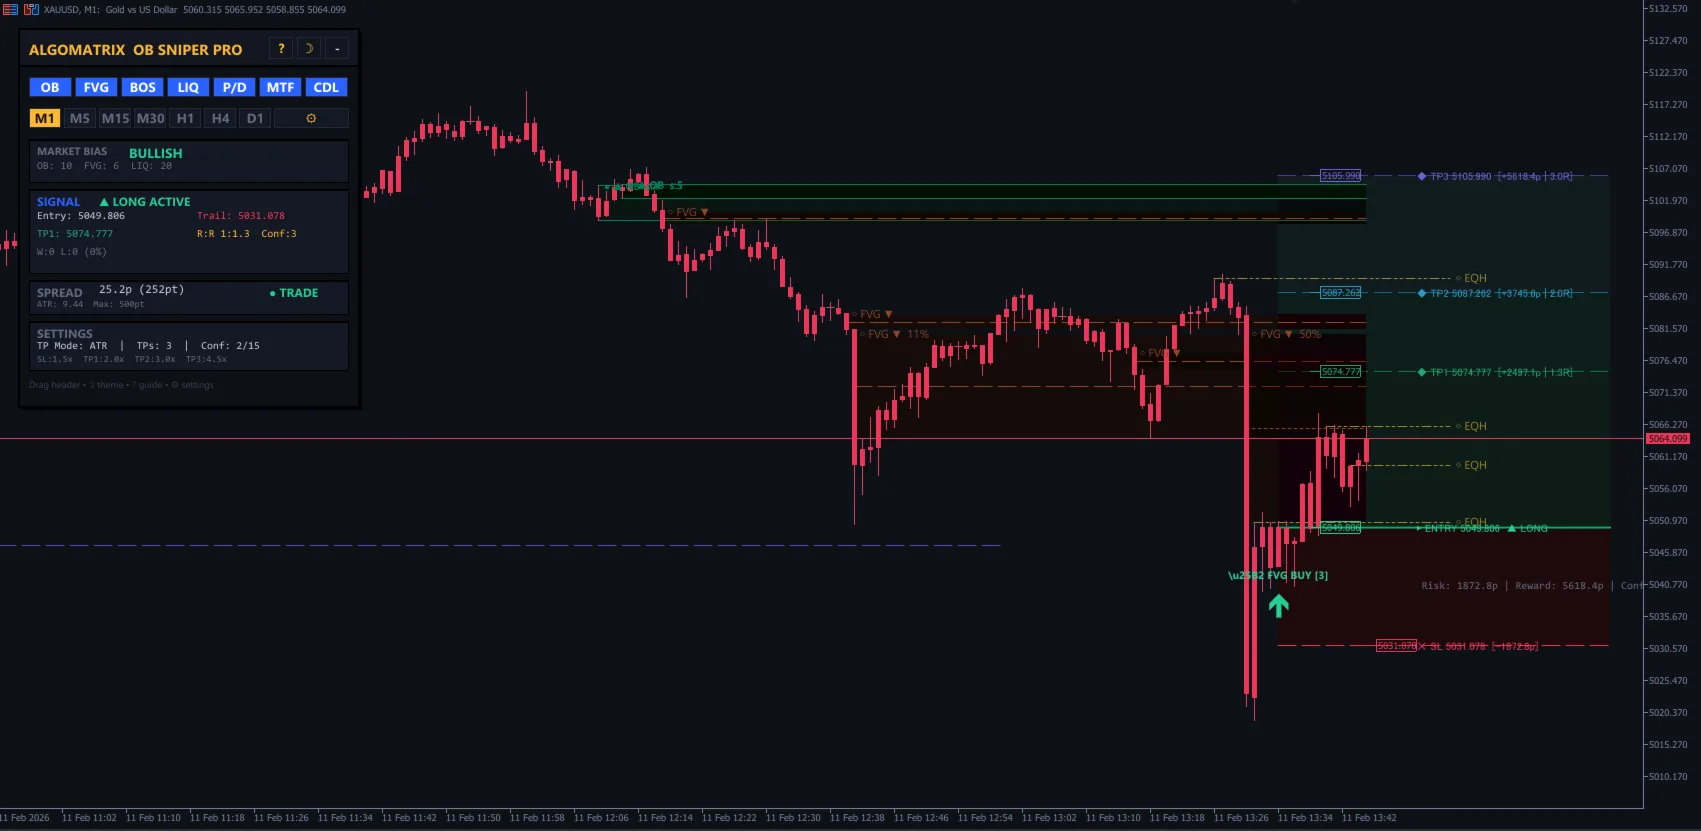
Not all order blocks are equal. I score each detected OB on a scale of 1-10 based on multiple factors:
- Impulse strength — how far did price move after the OB? A 200-pip impulse on gold creates a stronger OB than a 50-pip move.
- Structure break — did the impulse create a BOS or CHoCH? OBs that precede CHoCH (reversal) are often stronger because they mark the beginning of a new trend.
- FVG overlap — does the OB sit inside a Fair Value Gap? If yes, +2 points.
- HTF alignment — does the higher timeframe have a corresponding OB in the same direction? Multi-timeframe OB alignment is powerful.
- Freshness — has the OB been tested before? Fresh (untested) zones score higher than tested ones.
I typically only trade OBs scoring 7 or above. This filters out weak blocks and keeps my win rate above 55%. Taking every OB would drop me to maybe 40%, which isn't viable with normal risk management.
Multi-Timeframe Order Block Overlay
One of the most powerful features in my setup: overlaying higher-timeframe order blocks on my trading chart. If I'm trading on M15, I can see H1 and H4 order blocks projected onto my chart.
Why this matters: an M15 bullish order block that sits inside an H4 bullish order block has institutional support across two timeframes. The H4 OB represents a longer-duration institutional position — when price reaches both OBs simultaneously, the reaction is usually strong.
Conversely, an M15 bullish OB inside an H4 bearish OB is a conflict. The short-term institution is buying, but the longer-term one was selling at that same level. These conflicting OBs often produce choppy, unreliable reactions. I skip them.
The Complete OB Trading Workflow
Here's how I trade order blocks step by step:
- Identify the trend — use the BOS/CHoCH markings to determine whether the market is bullish or bearish on my trading timeframe
- Locate the OBs — the indicator marks them automatically with strength scores
- Filter by zone — only consider bullish OBs in discount, bearish OBs in premium
- Check the score — minimum 7/10 for a trade
- Check MTF alignment — the higher timeframe shouldn't contradict the trade direction
- Wait for price to reach the OB — don't chase, let price come to you
- Enter on confirmation — a bullish candle pattern at a bullish OB, or bearish pattern at a bearish OB
- Set SL below/above the OB — if the OB fails, the thesis is wrong
- TP at the next untouched OB or FVG — price tends to travel from one institutional level to the next
Common Mistakes Beginners Make
After teaching this framework to several traders, the same mistakes keep appearing:
- Trading every order block — most OBs fail. You MUST filter by score, zone, and timeframe alignment. Quantity does not equal quality.
- Ignoring the trend — buy OBs work best in uptrends (at pullbacks). Taking buy OBs against a confirmed downtrend is contrarian, which requires much more experience.
- Not waiting for confirmation — just because price touches an OB doesn't mean it'll react. Wait for a confirming candle before entering.
- Too-tight stop loss — your SL must be beyond the full OB zone. An OB from $2,800 to $2,795 needs a stop below $2,795, not at $2,798. Give the level room to work.
- Marking OBs on low timeframes only — M1 and M5 OBs are noise. Start with H1 or H4 OBs to learn the concept, then graduate to lower timeframes.
OB Trading vs Supply and Demand Zones
You'll notice significant overlap between order blocks and traditional supply and demand zones. They're related but not identical:
- Supply/demand zones are based on where strong buying or selling occurred (the visible result)
- Order blocks are based on where the institution's order was placed (the cause)
Sometimes they overlap — a supply zone's origin might be an order block. Sometimes they differ — a demand zone might encompass several candles, while the order block is just the last opposing candle within that zone.
I use both concepts. Supply/demand zones from the Supply Demand Zone Pro indicator give me the broad area. Order blocks from Order Block Sniper Pro give me the precise level within that area. Zone for the "where," OB for the "exactly where."
How to Identify High-Quality Order Blocks
Not all order blocks are created equal. After testing this framework on hundreds of gold trades, here are the quality filters that separate high-probability OBs from noise:
- Impulse move strength: The candle(s) that follow the order block should be aggressive — a minimum 2:1 ratio of impulse range to OB range. If a bearish OB candle has a 30-pip body, the bullish candle breaking structure after it should be at least 60 pips. Weak follow-through = weak institutional commitment.
- Break of structure: A valid OB (especially in smart money terms) must lead to a break of the nearest swing high (for bullish OBs) or swing low (for bearish OBs). If the impulse doesn't break structure, it's just a reaction — not a commitment. This is the #1 filter that reduces false signals.
- Untested/unmitigated: The OB should not have been re-visited by price since its creation. Once price returns to an OB level and fills the orders, that OB is "mitigated" and less likely to produce another reaction. Fresh, untested OBs have the highest probability.
- H1/H4 alignment: An M5 or M15 order block that aligns with a higher-timeframe OB or supply/demand zone has significantly more weight. When institutional footprints align across timeframes, it indicates genuine positioning rather than intraday noise.
- Volume confirmation: If your broker provides tick volume, check for elevated volume on the OB candle. High volume on the last opposing candle before an impulse suggests real order flow, not just a technical pattern.
Order Block Trading Plan: Entry to Exit
Here's the complete workflow I follow for every OB trade on gold:
- Step 1 — Identify trend: Check H4 and H1 charts. Is gold in an uptrend (higher highs, higher lows) or downtrend? I only trade bullish OBs in uptrends and bearish OBs in downtrends.
- Step 2 — Mark OBs: On M15 or M5, identify unmitigated order blocks using Order Block Sniper Pro. The indicator highlights them automatically with bullish (green) and bearish (red) zones.
- Step 3 — Wait for price to return: This is the hardest part. You wait. No chasing. Price must return to the OB zone for the setup to be valid. Roughly 60% of marked OBs get re-visited within the same session.
- Step 4 — Confirmation entry: When price touches the OB, I don't enter immediately. I wait for a rejection candle — a pin bar, engulfing, or doji showing buyers/sellers defending the level. This confirmation reduces fakeout entries substantially.
- Step 5 — Stop loss: Below the OB for bullish trades, above it for bearish. This gives the trade room to work within the institutional zone. Typically 20-40 pips for M15 OBs on gold.
- Step 6 — Take profit: My primary target is the nearest opposing OB or the recent swing high/low. I use a multi-TP approach: 50% at TP1 (nearest liquidity target), remaining 50% trailed using a trailing stop strategy.
Frequently Asked Questions
What is an order block in trading?
An order block is the last opposing candle before a strong price move. In bullish scenarios, it's the last bearish (red) candle before a powerful rally. In bearish scenarios, it's the last bullish (green) candle before a sharp drop. The theory is that institutional traders placed large orders at this level, creating a zone that price respects when it returns. Order blocks are a core concept in Smart Money Concepts (SMC) and ICT methodology.
Do order blocks work on gold (XAUUSD)?
Yes — gold is actually one of the best instruments for order block trading because it has deep institutional liquidity and clear, impulsive moves. Central banks, hedge funds, and sovereign wealth funds actively trade gold, creating genuine institutional order flow footprints. On M5 and M15 timeframes during London and New York sessions, OBs on XAUUSD produce consistent reactions approximately 55-65% of the time when properly filtered.
What timeframe is best for order blocks?
For gold scalping: M15 for identifying OBs, M5 for timing entries. For swing trading: H4 OBs with H1 entry timing. Higher timeframes produce fewer but more reliable OBs. I primarily use M15 OBs during London session, which gives me 2-4 tradeable setups per day on XAUUSD. H1 and H4 OBs are excellent for multi-day position trades.
How do I know if an order block is still valid?
An OB remains valid until it's been "mitigated" — meaning price has returned to the zone and traded through at least 50% of its body. An unmitigated OB that's 2-3 days old is still valid and often produces a strong reaction. Once price enters the OB zone and pushes through it, the institutional orders have been filled and the OB is considered used. The Order Block Sniper Pro indicator automatically tracks this and removes mitigated blocks from your chart.
What's the difference between order blocks and support/resistance?
Traditional support/resistance is typically drawn from swing highs/lows or round numbers — horizontal price levels where price has reversed before. Order blocks are specific candles representing institutional positioning before impulsive moves. The key difference: S/R levels often get tested multiple times and weaken with each touch. Order blocks are strongest on their first retest and weaken significantly after the first mitigation. They're complementary concepts — an OB sitting at a major support level is an extremely high-probability long setup.
Can I combine order blocks with EMA ribbons?
Absolutely — this is one of my favorite setups. Use the EMA ribbon for trend direction and momentum, then use order blocks for precision entry levels. If the EMA ribbon shows a bullish trend (fast EMAs above slow, ribbon expanding), you only look for bullish order blocks. When price pulls back to a bullish OB that sits right at the EMA ribbon zone, you have a confluence of institutional level + dynamic support — one of the highest-probability entries available on gold.
Disclaimer: This article is educational content and not financial advice. Smart money concepts are theoretical frameworks that may not accurately represent actual institutional activity. Trading involves significant risk of capital loss. Always test thoroughly on a demo account before risking real capital.