Five minutes before London open, my routine is the same every day. I sit down, open one chart in MetaTrader 5, and within 30 seconds I know exactly which of my 30 watchlist pairs have the highest probability setups right now. No flipping between charts. No opening 20 windows. One panel, one glance.
This article is about pre-market scanning efficiency — how I narrowed down from constantly switching tabs and missing setups to having a single dashboard that ranks every symbol by confluence score in real time. If you trade more than 3 pairs, this will change your workflow.
The Problem with Manual Chart Scanning
I used to flip through 20+ charts every morning. Open EURUSD, check the EMAs, check RSI, check volume. Switch to GBPUSD, repeat. Switch to USDJPY, repeat. By the time I finished scanning the 15th pair, the first three I'd checked had changed. And I'd inevitably miss the best setup because I was busy looking at a pair that did nothing all day.
The math is brutal: if each pair takes 30 seconds to properly assess (check trend, check oscillators, check volatility), scanning 20 pairs takes 10 minutes. London session's first directional push often starts within 5 minutes of the 7:00 UTC bell. You're literally late before you start.
The other problem is cognitive overload. After looking at 10+ charts with different indicators, your brain starts losing resolution. Which pair had the bullish RSI divergence? Was GBPJPY overbought or just approaching? You end up taking notes on paper — which defeats the purpose of having a computer.
What a Multi-Symbol Scanner Actually Does
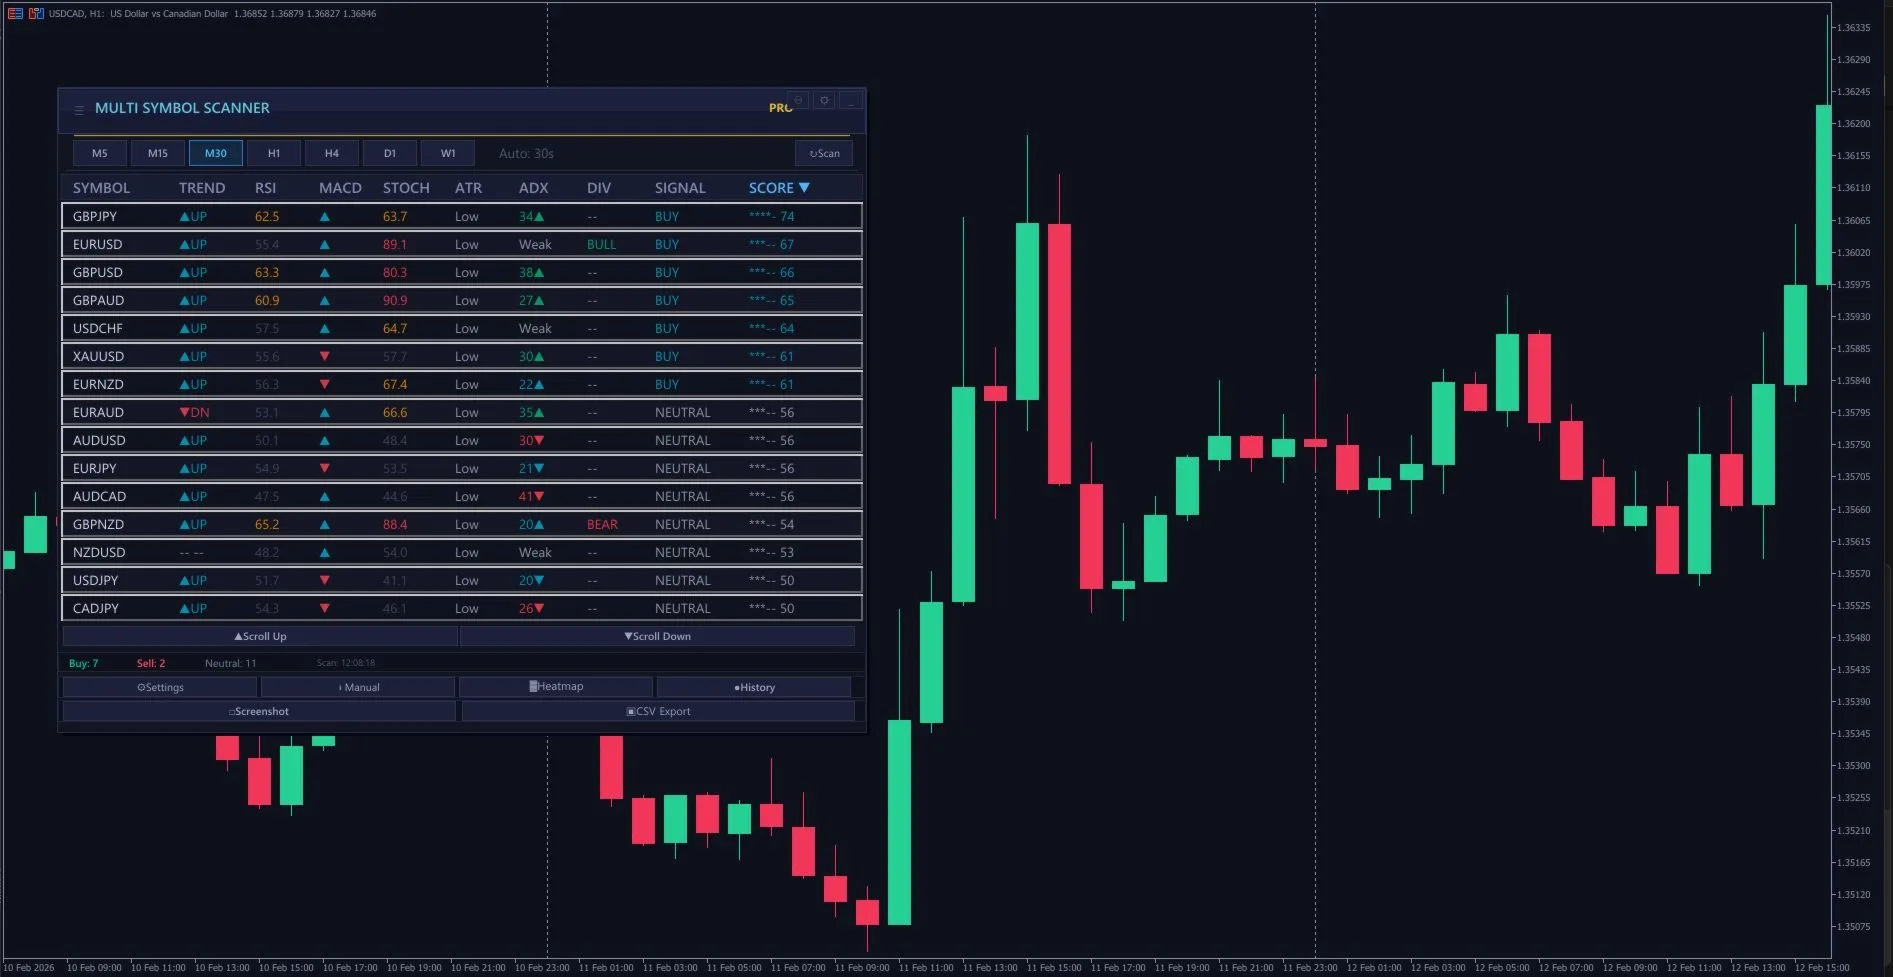
A dashboard scanner reads indicator data from multiple symbols simultaneously and displays it in a table format on a single chart panel. Instead of running RSI on 20 charts, the scanner calculates RSI for all 20 symbols in the background and shows you the values inline.
The scanner I built (Multi Scanner Pro) runs 8 indicators across up to 30 symbols and 7 timeframes:
- EMA Trend — fast/slow crossover direction and gap percentage
- RSI — value + overbought/oversold signals
- MACD — histogram direction, signal line crossover
- Stochastic — K/D cross with overbought/oversold zones
- ATR — absolute value and volatility classification (low/medium/high)
- ADX — trend strength with DI+/DI- direction
- RSI Divergence — bullish/bearish divergence detection over configurable lookback
- Volume — current vs average volume ratio
Each indicator generates a directional signal (-2 to +2, from strong sell to strong buy), and these signals are combined into a single confluence score from 0 to 100. A score above 70 means most indicators agree on direction. Below 40 means mixed or counter-trend.
My Scanning Routine: Step by Step
Step 1 — Sort by confluence score (2 seconds)
The dashboard auto-sorts symbols by score. Highest confluence at top. I immediately see which 3-5 pairs have the strongest agreement across all 8 indicators. These are my candidates for the session.
Step 2 — Check the top 5 for session context (10 seconds)
I look at the ADX column for the top-scoring symbols. If ADX is above 25 with strong directional (DI+ > DI-), the trend is real, not just oscillator noise. If ADX is below 20 despite a high score, the pair might be in a range — which requires a different playbook.
Step 3 — Check RSI divergences on low-scoring pairs (10 seconds)
Sometimes the best trade isn't the strongest trend — it's the reversal. I scroll to the bottom of the list and check the RSI Divergence column. A bullish divergence on a pair with a low score means the selling pressure is weakening. These are contrarian setups I'll flag for later in the session.
Step 4 — Click a symbol to switch the chart (5 seconds)
The panel is interactive — clicking any symbol row switches my main chart to that pair. Now I can see the actual candlesticks, draw levels, and plan my entry. I typically do this for my top 2-3 picks from the scan.
The Confluence Score: How 8 Indicators Become One Number
The scoring works by weighting each indicator's signal and normalizing to 0-100. Here's the breakdown:
- EMA Trend and ADX carry the highest weight — they represent the structural trend
- RSI and MACD carry medium weight — momentum confirmation
- Stochastic and Volume carry lower weight — secondary confirmation
- RSI Divergence acts as a modifier — it can boost or reduce the score depending on whether divergence confirms or contradicts the trend
A perfect 100 score would mean: all EMAs aligned, RSI confirming, MACD histogram growing in direction, stochastic not overbought/oversold against the trend, ADX above 25, volume above average, and no counter-divergence. I rarely see 100 — anything above 75 is a strong setup.
The practical effect: instead of subjectively deciding "this chart looks bullish," I have a quantified measure. Two traders looking at the same chart might disagree on direction. Two traders looking at the same confluence score can't — it's a number.
Multi-Timeframe Heatmap: Seeing the Big Picture
The dashboard includes 7 timeframe tabs: M5, M15, M30, H1, H4, D1, W1. I can switch between them to see how signals change across timeframes.
My workflow: I scan on H1 first (the default) to find trending pairs. Then I switch to M15 for the top candidates to check for entry timing. If H1 says strong buy and M15 also says buy, that's multi-timeframe alignment — the highest-confidence setup.
If H1 says strong buy but M15 says neutral, it means the short-term has already pulled back or consolidated. I'll wait for M15 to align before entering, or look for a pullback entry to the EMA ribbon.
Dark Mode, Light Mode, and Expanded View
A small but important feature: the panel supports dark mode with a single toggle. When I'm trading at 6 AM with dim lights, white background panels are eye-burning. Dark mode with frosted-glass aesthetics makes pre-market scanning comfortable.
The expanded view doubles the font size and row height for traders on larger screens or those who need more visual clarity. On a 4K monitor, normal view would have tiny text. Expanded mode makes it readable at arm's length.
Alert System: Get Notified Without Watching
I don't sit and stare at the dashboard all day. The scanner has an alert threshold — when any symbol's confluence score crosses above my configured level (I use 65), I get a notification. Options include sound alert, push notification to phone, or email.
Each alert has a cooldown period (I use 300 seconds) so the same symbol doesn't spam me. If EURUSD hits 70 and I get alerted, it won't alert again for 5 minutes even if the score stays above threshold.
This means I can set the scanner running and do other things — analysis, journaling, even walking away — and come back only when a high-confidence setup appears on any of my 30 watchlist symbols.
Symbol Lists: Customization for Different Strategies
The default watchlist includes 20 major and cross pairs: EURUSD, GBPUSD, USDJPY, AUDUSD, NZDUSD, USDCAD, USDCHF, GBPJPY, EURJPY, AUDJPY, EURGBP, EURAUD, GBPAUD, EURNZD, GBPNZD, AUDNZD, AUDCAD, NZDCAD, CADJPY, and more.
But I trade gold too, so I customize the list. I add XAUUSD, XAGUSD, and remove some exotic crosses I don't trade. You enter custom symbols as a comma-separated list and set max symbols. The scanner handles up to 30 simultaneously.
For gold-focused sessions, I sometimes run a second instance with just XAUUSD and correlated instruments (DXY, US10Y if available) to see how gold's correlation landscape looks before entering.
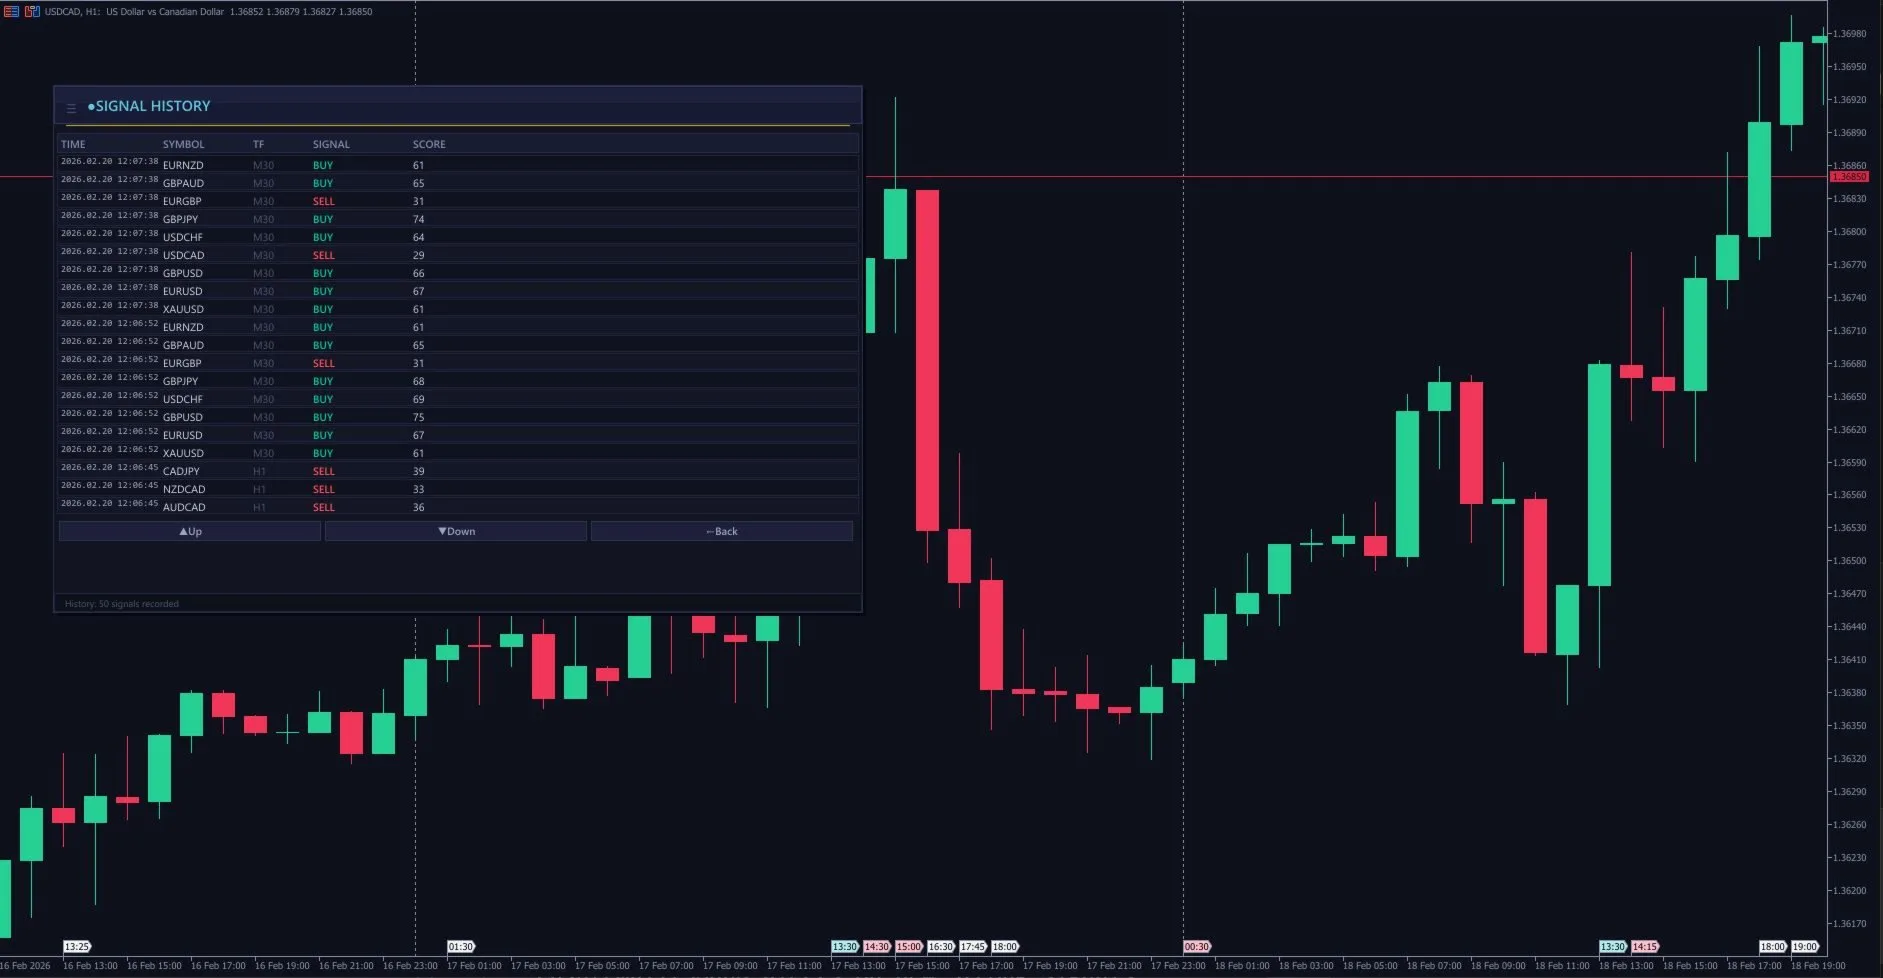
CSV Export: Building Your Trading Journal
Every scan result can be exported to CSV. This is underrated. After a month of scanning, I have historical data on which pairs had the highest scores, which timeframes produced the best signals, and which indicator combinations were most predictive.
I use this data for two things:
- Strategy refinement — identifying which pairs consistently produce high-confluence setups (I should trade more of those)
- Session analysis — which times of day produce the best scores (answer: London open and NY open consistently score higher than Asian session)
What I Learned from Scanning 30 Pairs Daily
After months of using the scanner daily, some patterns emerged that changed how I trade:
- Most pairs are flat most of the time. On any given H1 scan, usually only 3-5 out of 30 pairs have scores above 65. The market isn't always moving everywhere. Finding the few pairs that ARE moving is the entire edge.
- Confluence beats individual signals. A pair with RSI at 75 (overbought) but ADX at 35 (strong trend) and MACD growing will keep rallying. Single-indicator analysis would say "sell" — the confluence score correctly says "buy."
- RSI divergence is the best contrarian signal. When I see bullish RSI divergence on a pair at the bottom of my score list during late New York session, that pair often reverses by the next London open. It's my favorite overnight swing setup.
- Scanning is NOT the same as trading. The scanner tells you where to look. You still need to analyze the chart, plan your entry, set your risk, and execute. The scanner saves 90% of the scanning time so you can spend that time on trade management.
My Pre-London Routine: The Complete Workflow
Here's my exact pre-market routine using the scanner:
- 06:50 UTC — Open MT5, load my session workspace with the scanner on the main chart
- 06:51 — Run a fresh scan on H1. Sort by score. Note the top 5 pairs.
- 06:52 — Switch to M15 for those 5 pairs. Check if shorter timeframe supports the H1 direction.
- 06:53 — Click into the top 2-3 aligned pairs. Draw quick support/resistance from H4.
- 06:55 — Set the alert threshold to 65, scanner running in background.
- 07:00 — London opens. I'm watching my pre-selected 2-3 pairs with full context. The scanner alerts if anything else spikes.
Total prep time: 5 minutes. Compare that to 15-20 minutes of manual flipping, and you see why this tool exists.
The difference isn't just speed — it's consistency. When you scan manually, your eyes glaze over around pair #12. You start rushing through the last 8. The scanner applies the exact same analysis to symbol #1 and symbol #30. No fatigue, no bias, no shortcuts.
Building a Multi-Symbol Watchlist: Which Pairs to Scan
Not every symbol deserves a spot on your scanner. Here's how I built my 28-pair watchlist over time:
- Gold (XAUUSD): My primary instrument. Always on the scanner, always monitored first.
- Major forex pairs (7): EURUSD, GBPUSD, USDJPY, USDCHF, AUDUSD, USDCAD, NZDUSD. High liquidity, tight spreads, well-behaved technicals.
- Major crosses (8): EURJPY, GBPJPY, EURGBP, AUDJPY, CADJPY, EURAUD, GBPAUD, NZDJPY. These offer volatility and clean trends when majors are ranging.
- Metals (2): XAUUSD and XAGUSD. Silver often leads or confirms gold moves.
- Indices (4): US30, NAS100, GER40, JPN225. Not for trading directly (different strategy), but for correlation awareness. When US30 dumps, gold often rallies — I want to know immediately.
I explicitly exclude exotics (USDTRY, USDZAR, etc.) because their spreads and volatility profiles don't suit my EMA-based scanning criteria. I also exclude crypto pairs — they have their own dashboards and scanning logic.
The sweet spot is 20-30 symbols. Below 15, you're not getting enough diversification benefit. Above 40, the dashboard becomes visually cluttered and the processing load slows MT5 on modest hardware.
Using Scanner Results to Build a Correlation-Aware Portfolio
One danger of multi-symbol scanning is taking correlated trades. If EURUSD, GBPUSD, and AUDUSD all show bullish signals simultaneously, they're all essentially "short USD" trades. Taking all three triples your effective USD exposure rather than diversifying.
My correlation rules:
- Maximum 2 same-direction USD trades: If EURUSD and GBPUSD are both bullish, I pick the stronger setup and skip the other, or take both at half size each.
- Gold + USD awareness: Gold is inversely correlated with DXY roughly 70% of the time. If I'm long gold and the scanner shows EURUSD sell signals (strong USD), I tighten my gold trailing stop or reduce size.
- JPY pairs cluster: When risk-off hits, ALL JPY crosses dump simultaneously. Taking EURJPY + GBPJPY + AUDJPY buy signals is essentially one trade, not three. Treat JPY crosses as a single exposure bucket.
The Multi Scanner Pro dashboard makes spotting these correlations easy because you see all signal directions at a glance. When 5 pairs all flash the same direction — that's a macro move, not 5 independent opportunities.
Frequently Asked Questions
How many symbols can MT5 scan simultaneously?
MT5 can technically handle 100+ symbols in Market Watch, but practical scanning with indicator calculations is best limited to 30-40 symbols. Beyond that, you may experience lag on lower-end hardware (below 8GB RAM). The Multi Scanner Pro is optimized for up to 30 symbols simultaneously with real-time updates. Ensure the symbols are added to your Market Watch and have historical data downloaded before scanning.
Do I need to have all symbol charts open for the scanner to work?
No. Multi Scanner Pro reads symbol data directly through MT5's API — you only need the symbols added to your Market Watch panel. You don't need to open individual charts for each pair. However, make sure you've loaded enough historical data by scrolling back on each symbol's chart at least once (this triggers MT5 to download the history from your broker).
What indicators does the scanner check?
The scanner evaluates EMA ribbon alignment, trend direction, momentum strength, and signal confluence across your configured parameters. It's essentially running the same multi-EMA analysis you'd do manually on each chart — but across all 30 symbols every time a new candle closes. The dashboard displays the overall signal direction (buy/sell/neutral) and signal strength for each symbol.
Can I use the multi-scanner for swing trading, not just scalping?
Absolutely. Set the scanner timeframe to H1 or H4 instead of M5/M15. The analysis logic works identically — it just evaluates trend and momentum on higher timeframes. For swing trading, scan once in the morning and once in the evening. The signals change less frequently on H4, so you don't need to watch the dashboard all day. This is actually one of the most time-efficient ways to find swing trading setups across multiple markets.
How do I filter out low-quality scanner signals?
Three filters I use: (1) Only take signals where the trend direction agrees across at least 2 timeframes (e.g., M15 and H1 both bullish). (2) Require signal strength above 60% (the scanner provides a strength percentage). (3) Check spread — if the current spread is above 2× normal for that symbol, skip it regardless of signal quality. Combining these three filters typically reduces 30 raw signals per day down to 5-8 high-quality setups.
Is multi-symbol scanning better than focusing on one pair?
Both approaches have merit. Specializing in one pair (like XAUUSD) gives you deep understanding of that instrument's behavior patterns. Multi-symbol scanning gives you more opportunities and diversification. My approach is a hybrid: gold is my primary focus (I know its personality intimately), but the scanner alerts me when other pairs offer cleaner setups. Some days gold ranges all session while GBPJPY trends perfectly — the scanner catches those opportunities that a gold-only trader would miss entirely.
Disclaimer: This article describes my personal trading workflow and is not financial advice. Trading forex involves significant risk of capital loss. Past scanning results do not guarantee future performance. Always demo test before going live.